Difference between revisions of "ITerm"
| Line 2: | Line 2: | ||
== Installation == | == Installation == | ||
Download [https://github.com/Kobo-InkBox/user-applications/blob/main/download/ITerm.zip ITerm.zip] and unzip it in <code>[onboard-storage]/.apps/</code>. | Download [https://github.com/Kobo-InkBox/user-applications/blob/main/download/ITerm.zip ITerm.zip] and unzip it in <code>[onboard-storage]/.apps/</code>. | ||
== | |||
'''Important''': If you plan to interact with programs that are using the HTTPS technology, you must add <code>0</code> to the <code>RequiredFeatures</code> array of ITerm's <code>app.json</code> (located in <code>[ITerm.zip]/ITerm/app.json</code>) so that it will mount SSL certificates to the container, otherwise, it won't work. | |||
== Use cases == | |||
=== Default === | === Default === | ||
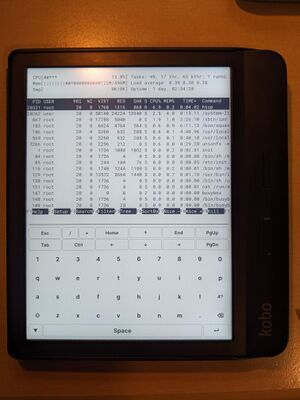
ITerm runs in a containerized environment by default and thus, the provided userspace is quite limited. You can use various <code>busybox</code> commands, such as editing a file with <code>vi</code> or watching the process list with <code>top</code>. | ITerm runs in a containerized environment by default and thus, the provided userspace is quite limited. You can use various <code>busybox</code> commands, such as editing a file with <code>vi</code> or watching the process list with <code>top</code>. | ||
| Line 37: | Line 39: | ||
</pre> | </pre> | ||
This will start a telnet server on port 8900. | This will start a telnet server on port 8900. | ||
=== Extensions === | |||
[[File:Iterm gomuks.png|thumb]] | |||
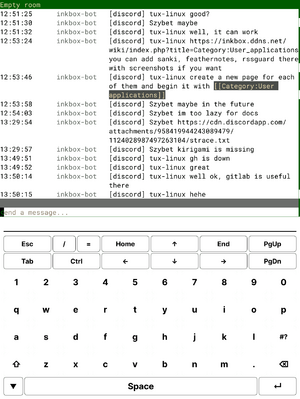
ITerm is an unique user application in the way that the [https://inkbox.ddns.net/git/tux-linux/rootfs/-/blob/master/etc/init.d/gui_apps#L207-224 GUI user applications system service] specially looks for extensions made for it. For example, if you like the [https://matrix.org Matrix] protocol and you'd like to get [https://github.com/tulir/gomuks gomuks] working on ITerm, you can. | |||
ITerm is probably the only app in InkBox OS that doesn't require signed extensions because privilege escalation risk from other binaries should be pretty low (since it runs in an unprivileged chroot). | |||
As such, to prepare and install your own extension, you can follow these steps: | |||
# In an empty folder, create two subdirectories, named <code>bin</code> and <code>lib</code>. | |||
# Put your extension's binaries and libraries in the appropriate directories. | |||
# Package it with the following command, assuming you are in the root directory of the future extension: <code>mksquashfs . ../my-extension.isa -b 1048576 -comp xz -Xdict-size 100% -always-use-fragments</code>. This filename '''cannot contain spaces or special characters'''. | |||
# In your device's mass storage, head over to <code>.apps-data</code>. | |||
# Create a directory named <code>extensions</code> if it doesn't already exist. | |||
# Copy the <code>*.isa</code> file you created earlier in this directory. | |||
# When you launch ITerm again, the contents of your extension should appear in <code>/app-data/extensions/my-extension/</code>. | |||
Revision as of 13:06, 29 June 2023
ITerm is a Qt-native terminal emulator app using libvterm for interacting with a virtual TTY.
Installation
Download ITerm.zip and unzip it in [onboard-storage]/.apps/.
Important: If you plan to interact with programs that are using the HTTPS technology, you must add 0 to the RequiredFeatures array of ITerm's app.json (located in [ITerm.zip]/ITerm/app.json) so that it will mount SSL certificates to the container, otherwise, it won't work.
Use cases
Default
ITerm runs in a containerized environment by default and thus, the provided userspace is quite limited. You can use various busybox commands, such as editing a file with vi or watching the process list with top.
SSH or telnet from the local environment
You can SSH or telnet to external hosts from the local environment, for example:
$ ssh user@some.hosts.ip.address
or:
$ telnet some.hosts.ip.address
SSH or telnet to the local environment
SSH
Should you want, for some reason, to access the current ITerm CLI environment via SSH from an external computer, you may do so by invoking the following commands in ITerm itself:
$ mkdir -p /app-data/.ssh
$ dropbearkey -f /app-data/.ssh/id_dropbear
$ dropbear -r /app-data/.ssh/id_dropbear -p 8900
This will start an SSH server on port 8900.
To access it:
user@computer $ ssh -p 8900 user@your.kobos.ip.address
user@your.kobos.ip.address's password: <type 'user' here>
$ export PATH="/app-bin:/system-bin" HOME="/app-data"
telnet
Should you want, for some reason, to access the current ITerm CLI environment via telnet from an external computer, you may do so by invoking the following command in ITerm itself:
$ telnetd -l /system-bin/sh -p 8900
This will start a telnet server on port 8900.
Extensions
ITerm is an unique user application in the way that the GUI user applications system service specially looks for extensions made for it. For example, if you like the Matrix protocol and you'd like to get gomuks working on ITerm, you can.
ITerm is probably the only app in InkBox OS that doesn't require signed extensions because privilege escalation risk from other binaries should be pretty low (since it runs in an unprivileged chroot).
As such, to prepare and install your own extension, you can follow these steps:
- In an empty folder, create two subdirectories, named
binandlib. - Put your extension's binaries and libraries in the appropriate directories.
- Package it with the following command, assuming you are in the root directory of the future extension:
mksquashfs . ../my-extension.isa -b 1048576 -comp xz -Xdict-size 100% -always-use-fragments. This filename cannot contain spaces or special characters. - In your device's mass storage, head over to
.apps-data. - Create a directory named
extensionsif it doesn't already exist. - Copy the
*.isafile you created earlier in this directory. - When you launch ITerm again, the contents of your extension should appear in
/app-data/extensions/my-extension/.

